Showing posts with label butchering. Show all posts

Tuesday, February 24, 2015

CHOP RITE TWO #22, A Review

Chop-rite Two Screw Down Meat Chopper

THE CHOP RITE TWO #22 MEAT GRINDER

Why is he talking about a meat grinder?


The other day I was listening to one of my favorite podcasts and that day the topics were based on people calling in and asking questions.  Well this day a nice (he seemed nice over the phone at least) guy called in and wanted to know about a good hand crank meat grinder for making/grinding his own (I believe) chicken sausage.  I thought Jack did a good job answering the question and one of his recommendations was for a Chop Rite Two meat grinder.  I though to myself "Hey, I have one of those!" and then did a search for a review of one on the internet...  I didn't find any.  Seriously?  Somewhere on the world wide web there had to be a product review of a Chop Rite Two #22 Meat Grinder!  Okay, so they talk about them on some forums and a few stores have reviews... but I have yet to find another blog that has done a full blown review... Until now!


Still in the box

BACKGROUND


My first deer was ground using a food grinder.  What would cause me to do that?  I'm glad you asked!  The first hand crank meat grinder I purchased from from Cabela's.  I figured that since it had their brand name on it, it was good stuff.  I couldn't have been more disappointed!  We were late going on vacation as we sat at the table while we wrapped up the grinding...

After that, I went to Lehman's website to see what the Amish use (a good sign of quality) and found the Choprite brand (now Choprite Two).  They carry great products, but their prices are terrible... so I looked for somebody else who would sell me one.  I found the list of distributors and called around and found one that sold me one for a much better price.  I never did get the free jerky seasoning they advertise... but if you ever happen to order from them, let them know where you heard of them!

Since then I've wondered about companies like LEM Products, whether they make a better grinder for the price, and such.  But as of yet, nobody has offered to send me one to compare other brands to this one, so I can't give you and information on that.

A REVIEW


So while a picture of the box is nice, what you should really care about is what's inside!

Almost everything I need to grind burger.
What you can see in this picture is all of the components that make up the Choprite Two #22 Hand Crank Meat Grinder (you can also see the manufacturers parts list here).  You might note the custom Osage Orange handle (upper left) that I added to my grinder crank, the stainless steel (coated with anti-seize) bolts, nuts and washers (left) for bolting the grinder down to the painted board (right) that I c-clamp down to the kitchen table or counter top when I do my grinding.

At this point I'll spare you some reading and put up some in depth pictures of the different parts...

Feed screw.  The cutter sits over the square part of the feed screw.

The crank end of the feed screw (with the washer shown).

The crank (with custom made handle)


These next few pictures show how the crank attaches to the feed screw, such that it cannot be pulled off unless you rotate the crank backwards...


Lubricant... everything I seen recommends Silicone Spray.  I've had problems with the grinder plate rusting when I tried other options.

Installing the feed screw into the body...

Cutting knife installed...

Grinder plate installed...

In the picture above, observe the clocking pin at the top how it is aligned with a pin in the body. This prevents the grinder plate from spinning while you crank away... MAKE SURE THESE LINE UP!!!

The ring is snugged down...


Ready to bolt down and grind!

OPERATING A CHOPRITE TWO #22 MEAT GRINDER

Once you have the grinder bolted down to something solid... WAIT A MINUTE!  IF you really want this baby to shine, there are a few things you need to think about before you get started.

TEMPERATURE:  Any grinder will work better when the meat is on the verge of being frozen.  I also will put the whole meat grinder in the freezer for an hour before I start grinding... I don't know if it makes too much of a difference, but it's not a lot of extra effort for a potential improvement in function.

SIZE:  If you feed the entire backstrap into the grinder, it will work... but it would do it much more easily if you cubed the meat into 2" cubes first!  (I would never grind a backstrap by the way)

CONTAINERS:  You probably don't want your burger to come out of the grinder and fall on the floor or your kitchen table.  It's much easier if you can put a bucket under the discharge side of the grinder to catch the ground meat.  Cleanliness is godliness here... but don't worry, you like your burgers well done anyway, right?

NOW... where were we?  Oh yes, bolted down.  Once it's bolted down and the meat is cubed and cold, just start pushing meat into the hopper on top and start cranking the handle.  I typically run my meat through the grinder once, then add in some small cubes of beef fat to my venison burger and run it through one more time.  I like 20-25% beef fat in my burger.

I don't have much more to say... so without further ado...

THE DOWNSIDE

Just to clear the water, let me tell you what I don't like about this product.  First of all, it's expensive.  I think I found mine for about $230.  Second, it requires you to do all the work... it's hand crank operated, which is also a plus.  Lastly, and most certainly my biggest gripe... the handle on this thing stinks!  Seriously, those are my only complaints... but let me expand on that last one for a moment.

When you are bearing down on this thing (which you shouldn't have to do if the blade/cutting plate are sharp!), you need to have a nice handle to hold onto.  You want a nice handle even if you're not bearing down, actually.  I happen to wear a large, sometimes extra large, glove size.  When I grasped onto the plastic handle that comes on this thing, I didn't have room to wrap all my fingers around the handle... very similar to holding a pocket pistol if you enjoy shooting pistols.  It's just not comfortable to let my pinky finger hang out there in the wind.  If I scrunched up on the other end of the handle, when the crank came around, it would pinch my hand... something had to change!

~Something had to change~


 My father has a nice workshop and does wood working in it.  He happens to have an old shopsmith that works as a lathe.  He also had some scrap Osage Orange limbs in a bucket... perfect!  I'll spare you the details and leave you with this... I made a new handle.

A home made handle

The old handle was held on by a pin that was pushed through the hole and then peened over.  This new handle is held on by a bolt with a washer at the head and between the crank and the handle.  Before I could install it, the hole was first tapped, using a tap and die set... I don't remember what size bolt.  Once in place, I used some blue loctite to make sure the bolt stayed in place... not too loose, not too tight.  Too loose and it will wallow out the hole... to tight and the handle won't spin on the bolt.

 ~Once I made this single change, I have been very pleased!~


CONCLUSION

I wanted a manual meat grinder because that's how I roll.  I like to minimize what can go wrong, and if the power is out, I still want to be able to grind up my meat!  This grinder has been used to butcher about 6 deer so far and multiple pork shoulders to make breakfast sausage.  (Feel free to share recipes if you have one you like!)  I got this thinking that my grand kids might someday use this to process their own meat and all indications say they will be able to do this.  This grinder is made of cast iron, except for the knife and cutting plate... and my custom made handle that I'm very proud of, if you can't tell.  It also has a FDA approved, food grade coating on it that makes cleanup a breeze (relatively speaking)... just don't chip it (I have yet to do that btw).

If you were looking for a life time investment in a meat grinder, I wouldn't hesitate to recommend this one to you.  I know for sure that this is a bomb proof meat grinder!  With a little TLC and sharpening of the grinder plate/knife every now and then, you'll have a grinder that you will be passed on to the next generation for years to come!

Monday, July 21, 2014

Butchering 59 Chickens in One Day...

WELL THAT WAS A MISTAKE!


I don't know how many of you have ever butchered a chicken, considered raising them or even eaten one...but let me tell you that it is not a fun process to butcher them.  Now Herrick Kimball makes a good tutorial and equipment plans for butchering them, and I am incredibly grateful for his work... but next year, we'll be paying somebody to do that work.

The process:

Killing a chicken... I turned it upside down in a killing cone and slit both sides of the neck.  Pretty easy.

Scald the chicken... keep the water between 145 and 150!  When the wing feathers come out easily, time to pluck.

Pluck... check out the Whizbang Chicken plucker.  I borrowed one from a guy at work... Thank God!

Butcher... http://www.butcherachicken.blogspot.com/   - Nuff said, good job Herrick!

Freeze the bird...

Be exhausted and have to clean up...

I need to get better at bringing in pictures to post!

Wednesday, June 11, 2014

An update... Wow, it's been a while!


At this point is really hard to tell where I left off.  So I guess I'll start with the most recent activities an work my way backwards.

  
Any guess what I've been up to?
 ...Or maybe I'll jump around a little bit.

Dehydrator Blues

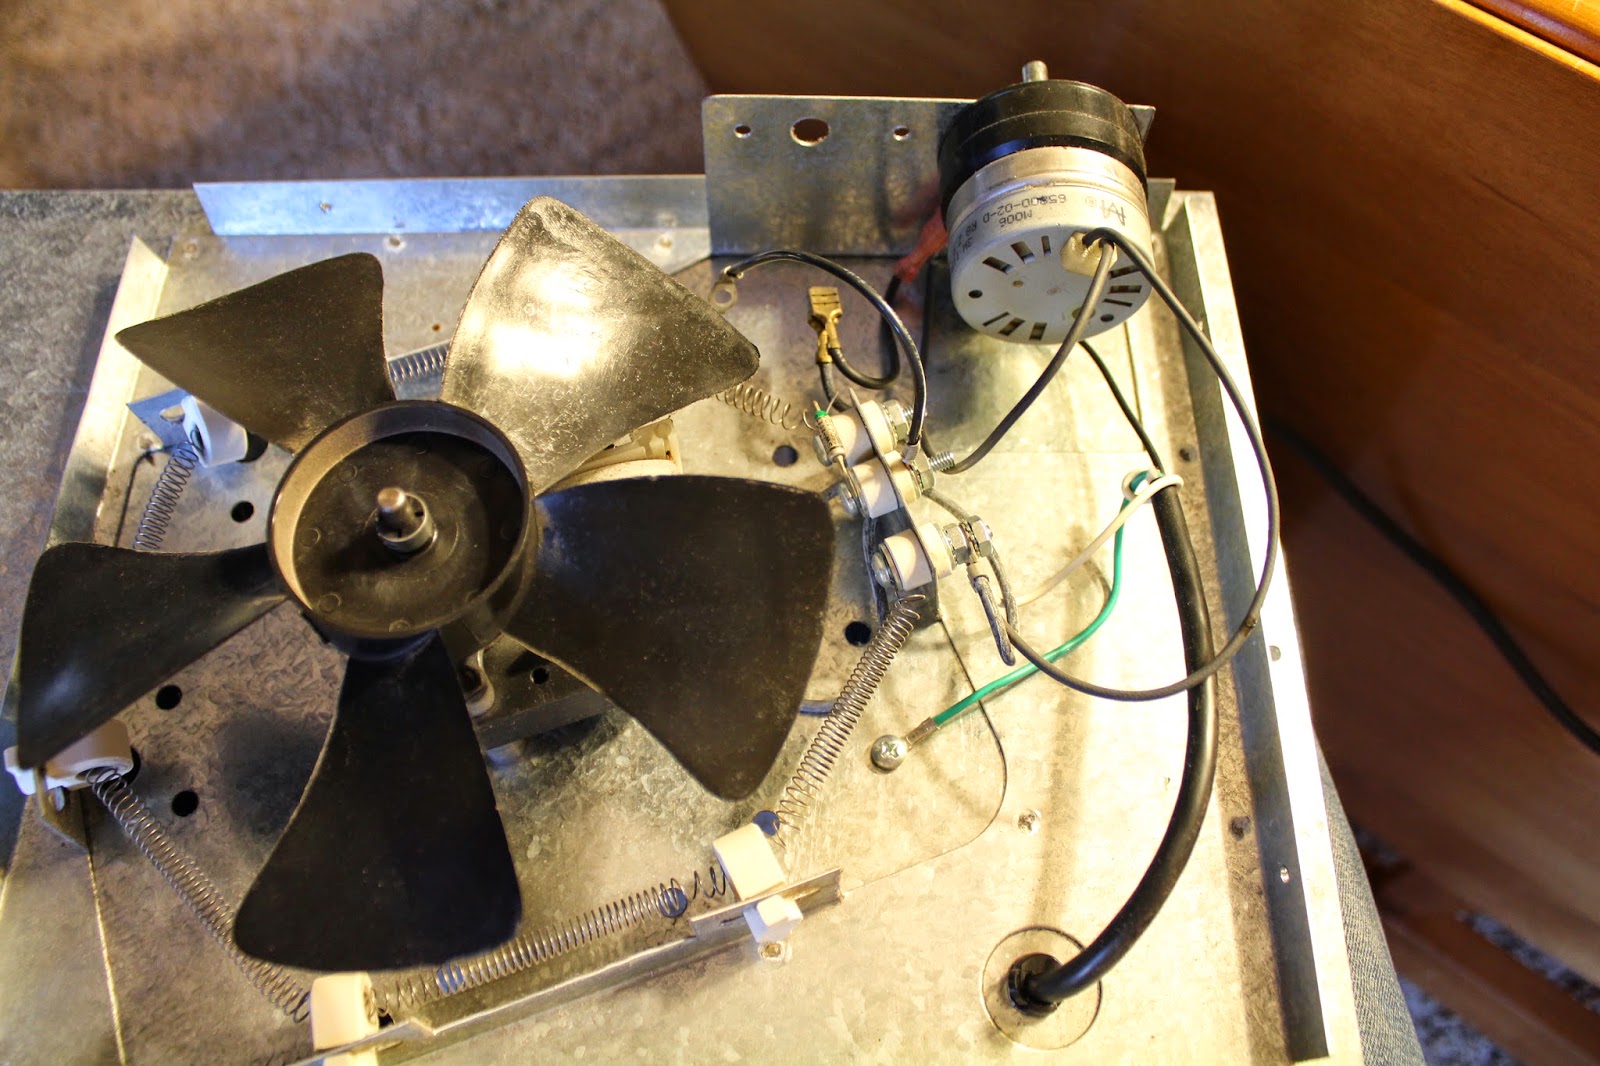
What you see above is the back panel to my Excalibur 9-tray dehydrator.  This thing has been a champ and I'm still quite pleased with it... but like all things electrical, sometimes they don't work right.

My wife and I had gone to the grocery store recently.  Being the type of person I am, we both always make a point to swing by the discount shelf to see if there is anything we like to eat on sale.  Well this time there were banana's on sale.  I bought a bunch!  When we got home and the kids were napping, I sat down and started slicing.  Before loading them into the dehydrator, I spray both sides with lemon juice to keep them from turning brown... they also dry better if I do.  I loaded them up, turned on the dehydrator and went about my life as normal.  The next day I came home and guess what... no heat (that means no dehydrating)!

So what you see above is the guts with the thermostat removed.  I contacted Excalibur (www.drying123.com) and they promptly (sort of) sent me a new thermostat and a new diode after I paid for shipping.   Then I put the banana's in the freezer and waited for the parts to come in.  I didn't do anything with the diode, so now it's sitting on a shelf by the old thermostat... which I played with and think it might work again... maybe I have a backup now?  More testing for sure!

The thermostat - the diode bridges the gap between the two screws on the right, between the fan blades.
Well I replaced the thermostat and now it works... and the banana's are still in the freezer.  I'll have to get to that soon!

SWALES


What a rototiller can do to a backyard...
 
So a bunch of weeks back my neighbor graciously accepted payment to help me roto-till my garden and also helped me by tilling up some contour lines in my backyard.   Then it became my job to turn those paths into swales.  The idea is that it is perfectly level and catches all the water run-off, holding it until it evaporates or soaks into the soil.  This helps reduce the need for watering things on the downhill side... which in my case means fruit trees and other food producers... like green beans :)  (We ran out of space in our garden this year.)

But anyway, this weekend my parents came up to help me celebrate my birthday and we, in general, had a great time.  One thing that I particularly enjoyed was my father's help digging the top swale.  Not only did we get it all dug and built, but I have found over the years that the best way to have a conversation with my dad is to take away the distractions, provide work (that doesn't require a lot of thought) to occupy one side of the brain and let the conversation occupy the other side of the brain.  This was one of those times when we were able to have a good conversation... the topic wasn't
too meaningful, but I still enjoyed working with my dad.

A swale
I don't know if you can see it, but basically I made a level ditch in my backyard... a fairly big one too!  This has taken a lot of work with a rake, pulling the dirt from the roto-tilled section towards the downhill side to create a berm of dirt... shallow enough that I can drive the mower over it without scabbing the lawn and ruining the blades.  But dad, being the very intelligent person he is, or maybe it's because it's the tool he had on hand, picked up a shovel and started digging it out.  Needless to say, it would have taken me a long time to finish up the first one without him.

CHICKENS

Those birds are getting big!  However, they are not immune to harm.  This was evidenced on Monday night while I was moving the chicken tractor back up towards the house.  Real quick - they have learned to move to the front when I move the tractor, as that's where the fresh grass is... but since the made it to the back of the yard, I had to reverse directions.  Well I ran over one of them while moving it and it died (I've run over a couple that made it just fine).  Well I fired up the turkey fryer, scalded it at 148°F (Thank you Herrick Kemball).  Anyway, I got to the step in Herrick's instructional where you remove the intestines where I ran into a problem.  Step 7 goes over opening up the back end and states the following:

-------------------------------------------------------------------------------------------------------------------------
"Please Note: When you cut into the bird’s body cavity, no liquid should come out. If liquid (i.e. yellow-colored water) does come pouring out of the opening, the bird is sick. Throw it away. I have had this happen on two birds in ten years."

-------------------------------------------------------------------------------------------------------------------------

Well guess what I found?

It died prematurely... and ended up in the compost... bummer!
When I cut it open, not only did the yellow liquid come out, but there were two very full sack's of it (see arrows in picture above).  I weighed it after plucking and it came out at 2-1/2 lbs... I guess it wasn't too much of a loss, but now I can't help but be afraid the rest of them are sick!  Still no word on what this sickness is, but I'm hoping I don't ever see it again!

Well here's an older picture (3 weeks ago) if anybody is curious what the inside of the chicken tractor looks like.  I'll have to get more pictures on my pen drive... blogging is hard when you are away from your home computer and camera!

Not quite old enough to use the big feeder!


UPDATE!


I got in contact with a nearby butcher who informed me this is called "Water Belly" and is quite common among fast growing meat birds.  My research says there's not way to cure it as it is a result of the cardiovascular system not being able to keep up with high blood pressure forcing liquid out into the body through the liver.  Can anybody verify this?

BIRTHDAY!

As I said, we celebrated my birthday recently.  My wonderful wife got me a new wooden handled, assembled in America (that's the best it comes these days, and she had to look hard to get even that!) digging shovel for fathers day and a 5 gallon crock for my birthday.  We can now make pickles 5 gallons at a time!  Yea... that's something I can get excited about!

Also, yesterday I went over to www.Starkbros.com and took advantage of their end of season sale.  I spent a good bit of money with the hope that I won't need to take them up on their 1 year promise of satisfaction, but feel good knowing its there if the plants die!  So yea, that was a good chunk of birthday money (thank you parents / in-laws / grandparents!)... but I got the following:

Two Peach Trees
Two Pear Trees
Two Sweet Cherry Trees
A Reliance grape vine (seedless) - great for making raisins or eating
Rhubarb
Asperagus
Red Rasberries

I highly recommend you guys get over there as they have some AWESOME prices right now!  I know a few of my buddies who are moving soon or have just moved... I can't think of a better investment than some fruit trees!

Okay, I'm late getting back to work.  Take care!