Tuesday, December 30, 2014

Food Mills vs Food Strainers

Food Tools

FOOD MILLS


The picture above shows a typical hand crank food mill.  These things are quite handy to have and can really cut down on the amount of labor/energy it takes to turn apples into apple sauce, tomatoes into tomato sauce, berries into jellies, etc.  I only have experience using them to make apple sauce...

To use this type of mill to make apple sauce, you first have to wash the apples, quarter them (I also cored them) and then cook them.  One that is done, you put them in this machine and they mash the fruit into the bowl it is sitting on and the skin/core stays in the mil and plugs up the holes... eventually you have to spin it backwards and throw out the skins and cores.

While this was a great improvement over the blender/food processor, there is yet a better option!

The Food Strainer and Sauce Maker

These come in a variety of different models...

Roma (~$50)
Victorio (~$50)
Norpro (~$63)
Squeezo (~$200 - not a typo!)
 Back to Basics (B2B) (~$100) (Shown above)

There is obviously a wide range of prices you can pay.  But since I have used a Back 2 Basics that I borrowed from a colleague, that is what I went with.  At this point I'll let you in on a secret...


The nice folks over at chefscatalog.com are currently selling this thing for $31.97 including tax and $0 shipping.  Get yours by clicking here.  (I don't do affiliate links if you are worried about that.)

Now why is that such an awesome deal?  Well aside from that fact that it typically costs $100, this thing really speeds things up!  No longer do I have to mess with emptying the core/skin from the food mill... or coring the apples.  Now, after I cook them, I drop the apples in to this thing and crank away!  (My kids aren't quite there yet, but my eldest tried his best this past year to help!)

The nice thing is that, as you can see above, the stuff I want drips down the white tray and into a bowl or stock pot, while the stuff I don't want gets pushed out the end through the clear plastic funnel into another bowl, perfect for the composting.  This is a continual process of feeding and cranking... only stopping when I need to empty a bowl or cook more apples!

OPTIONS!


Another nice thing about these food strainer (and sauce makers) is that they can be adapted to other uses.  There are berry screens that spit out the seeds (Diverticulitis anyone?), salsa screens for chunky tomatoes, and pumpkin screens for making pumpkin filling or processing winter squash!  Oh, and don't forget the grape spiral shown above... it's supposed to juice grapes with seeds... but rumor has it these machines don't work so well for that process... I'll let you know if I ever try it out!

Can you do that with a Foley food mill?  Maybe... but it's still more time and energy.

As always, feel free to share your thoughts!

Monday, September 8, 2014

Rest In Peace: Truet Cathy

He founded Chick Fillet... he took heat for sharing his beliefs and has now passed away...

...I look forward to meeting him on day!

Friday, August 29, 2014

Beware, the little green alien invasion!


RUN FOR YOUR LIVES!!!!

These terrifying soldiers could be in your back yard right now!

Just remember, the most important thing is to keep calm - DO NOT PANIC! If you do panic, you just might regret it later!  Keep reading...

Invader Vs Invader, who will win?


Well for those of you who are not familiar with the pictured critters above, you can see two different images that portray two very different scenarios.  While the first picture can be devastating to your tomato crops, the second picture is a view of hope in the future. 

What you see in both pictures are Tomato Horn Worms.  What you see in the second picture is the eggs of the Braconid Wasp on the back of the horn worm.  These little wasps fly around predating on caterpillars.  These eggs will hatch and the young'n will slowly feed on the worm as they hatch, killing it in the process.  See, no need to panic!

While I did kill the horn worms that did not have the eggs laid on them, I certainly left the second pictured one to help continue the life cycle of the Braconid Wasp.  I'm a big fan of the predatory insects in my garden, as long as they don't eat too many pollinators that is.

~Clinton


Monday, August 25, 2014

The Garden Update

 EDIT:  SOMEBODY PLEASE IDENTIFY THE MYSTERY ASIAN SQUASH SHOWN BELOW!  (I think it the seeds came from a co-worker, but he doesn't know what it is... he got the seeds from a lady at some Asian restaurant).


Sad looking sunflowers...

 But first... Vacation~!


It's really nice having a permanent job where I have vacation time, such a change from the years working as a contractor!  Taking advantage of this, I was able to take my family to visit my grandparents and other relatives in Kansas two weeks back.  We had a wonderful time relaxing... something I'm not good at.  It was great to spend time with family I haven't seen in nearly five years!  We ended it with some time in Arkansas where my uncle has a dock with a top notch ski boat.  He tried teaching my wife and I how to barefoot ski...  let me tell you something about barefoot skiing - DONT DO IT!  That may be harsh... but I came home from that experience with a greater understanding of my body and where it can hurt!  On a side note, I was able to get out and do some slalom skiing (one ski) which was an incredible blast!  The wife however, never was able to make it up on two skis... maybe another day.

Surprise!

Naturally while away I was a little apprehensive about what the garden would look like when we got home.  After ten days of not being around to manage everything, what would it look like?  Well last night I got around to taking some pictures.

The patio bed
This past spring I decided I wanted a nice raised bed next to the patio.  That way, any of the things we would eat on a regular basis would be close... such that Mrs. J wouldn't have to go all the way out to the garden to get whatever she might need while cooking.  That was the idea... the only thing that seemed to work out was the lettuce, now bolting (going to seed).  The broccoli was a terrible flop, I think the soil is worthless.  The carrots were likewise.  Also seen is a rouge squash and some celery - that was an experiment, but seems to be growing just fine, although we've yet to taste it.  It might just go into the dehydrator...

$2.50 each
I doubt you can see it, but there is a blueberry bush in the top left and a berry cane in the center of this pic.  Each were purchased from Tractor supply for $2.50 when things went on sale.  I would have had two blueberries, but I accidentally stepped on one.  I also bought two berries - one a golden rasberry the other a ???  I can't remember... oh well, only one made it and I don't know which one!

Jersey Knight Asparagus
This stuff seems to be doing well.  I planted it in some black gold from a neighbor and then covered it with packing paper (from the move) and then the horse manure/ sawdust mixture I had delivered.  I really works nicely to keep the weeds down!  Next year I'll have to edge the beds to keep the grass from growing into the bed.

Pole beans, etc
Well I like Herrick Kimball's idea for the tomato trellis so much, I did the same thing for the pole beans.  These are Rattle Snake beans from High Mowing Organic an the package says they grow to 8ft tall... well, mine will never get there.  Some of them did great, others just refused to come up.  Again, poor soil... you can also see how I mulched the garden with paper and horse manure to cover up the hard pack clay!

Garlic seed
I'm pretty sure you're not supposed to let the garlic go to seed like this if you want to harvest it for eating, but all the bulbs I dug up were so small anyway, I figured I'd give a shot at planting seeds this fall.  I was told that garlic is a heavy feeder on nitrogen... obviously my garden is lacking that!

Caged tomato's
These cherry tomato's are doing pretty good.  However, I'm having difficulty keeping them where I want them... which leads me to the Herrick Kimball Whizbang tomato trellis:

 My Whizbang Trellis's
Naturally I took my own interpretation when I built these, but I think it's close enough!  These trellis's are AWESOME!  I really love how I can weave the tomato plant through the cattle panels (each section is 1/3 of a panel) to train them as they grow.  No longer are there any plants laying on the ground, which really helps with diseases.

A little bit of congestion...
 As you can see, these things are a little congested.  Between each trellis I planted basil, which is doing great!  The tomato's on the right trellis are doing great too!  I've never had paste tomato's get so big without succumbing to blight.  Well see if this year is any different.  You might be able to see it, but in the second row (in this pic) of trellises, I planted a squash between the trellis's that seems to have a mind of its own, and has taken over at least two of these trellis'...

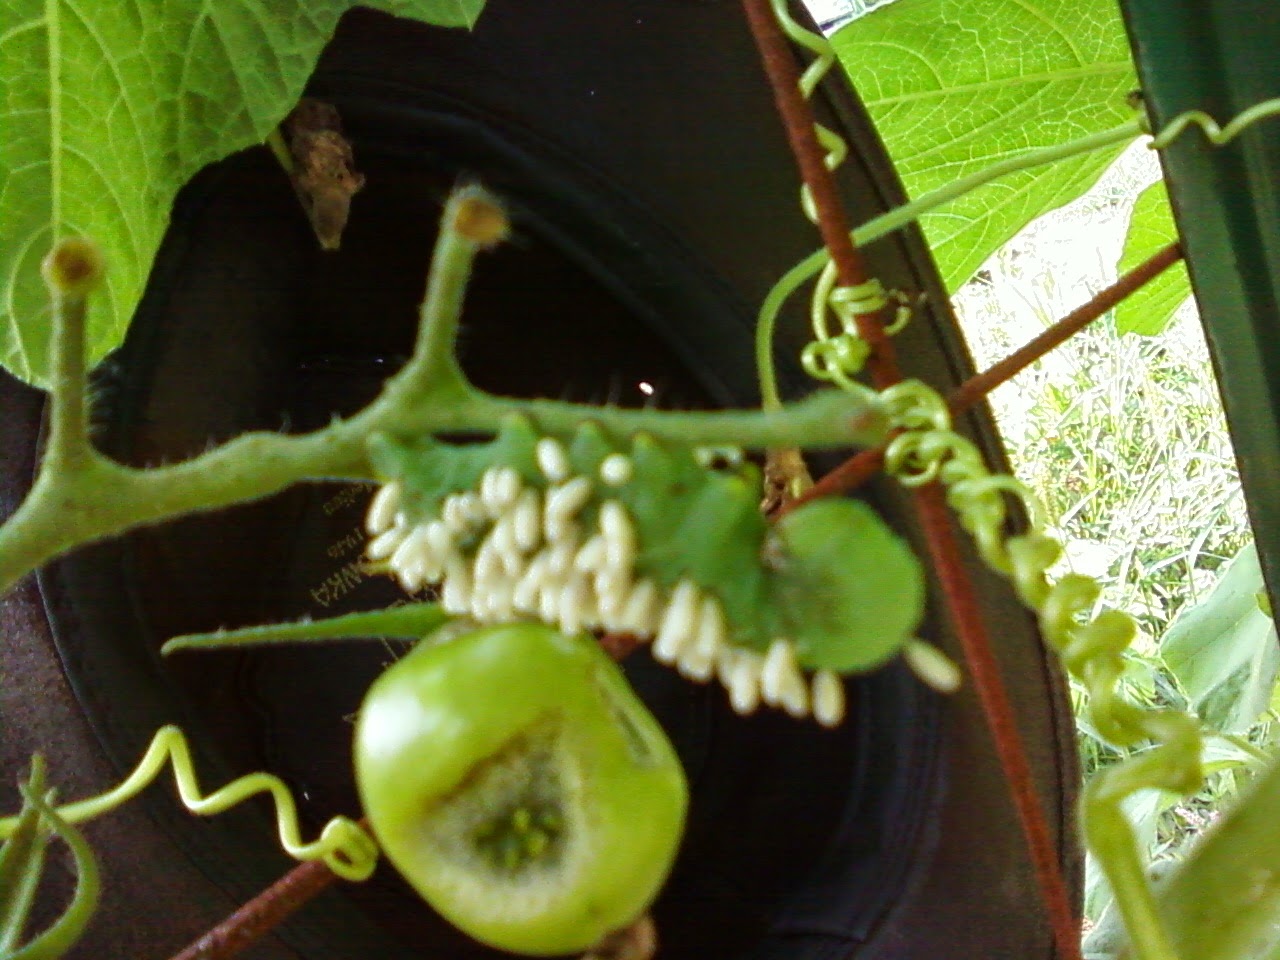
Honey Nut Butternut Squash Mystery Asian Squash... the freak show of my garden!
I suppose it's good that my tomato's here didn't grow bigger, because it quickly became apparent that the squash was going to win! 

Just at 24inches circumference
And on the left, 25 inches circumference

Needless to say, I'm quite pleased on how the tomato's and Honey Nut Butternut's Mystery Asian squash are doing!

Peppers!
At the beginning of the season, I had very low expectations for these peppers.  They were short and didn't look like they would go anywhere... but I have been pleasantly surprised to find a number of delicious greens on each plant!

German Chamomile
I had purchased a number of different flowers and herbs this spring and was really just experimenting.  Of all the hers/flowers I planted, the chamomile is the only one that really took off... and boy has it taken off!  I think we'll be planting this a border around the entire garden next year... I think it's quite pretty to be honest... hopefully it makes for good tea as well.

Walthamville (How many squash do you count?)
Another plant I'm excited about is the Waltham butternut's.  At my parent house, in the past, each year we would only get a few fruits before the plant took to the squash bug/mildew.  This year, I've only seen one bug and the mildew is only attacking the pumpkins...

My little rhubarb patch
 I'm telling you, the rhubarb from Stark Bro's is pretty awesome!

Sweet potato patch
I know Sweet Potato's do better (at setting fruit) when they are stressed, so this year may not be the best... but at least I tried!  (Multiple layers of horse manure and cardboard or paper).

My new vineyard
Many thanks again to Herrick Kimball for all of his work on gardening and sharing some of it on his websites!  (I do wish he'd finish up his site for those lamps though!)  Anyway, this is my new grape vineyard.  I need to replace the t-posts on the ends with some wooden posts, but everything in between is awesome!  Thank you also to Tractor Supply for the free grape vines!  Don't worry, I spent nearly $200 there to get this thing set up... in the end, we both won!

Stringing up the vines
I really don't know anything about growing grapes, training them or pruning... but I think I'm on the right track.  I'm simply wrapping the young vine around some twine to get it to grow the direction I desire.

Grrr!!!!  Japanese Beetles...
I'm going to have to figure something out here... these guys are just plain destructive!  Although on the bright side, maybe they will kill all of the bluegrass in my lawn!  That stuff will send roots underground that pop up all over the edges of garden beds... not my friend.

Pollinators, woohoo!
I thought there were not any bees in the area... apparently I was wrong!  Notice the yellow pollen on the bees legs (not the bumble bee's)... that's what goes into making honey!  You can bet I'll be planting a lot more sunflowers next year!  (I'm wanting to get my own bees.)

The swale bed
I hand dug a swale (click here for an explanation of swales) in my backyard and planted some green beans over it... the difference between the mulched an non-mulched beans is pretty obvious in this picture!

And here are a few of my fruit trees...


Enjoy!

June 2014

This is a little late getting out... sorry!

 JUNE

Well that sure flew by!  I'll try to start from the top...

Bee's

For a couple years now I thought it would be neat to keep bees.  So when I saw an add on Craigslist for bee keeping equipment, I jumped on it!  $80 later I came home with two books (that I could have gotten on Amazon or half.com for less - I have to learn to be a better haggler), some lemon grass oil (for attracting swarms to a hive box), a smoker, a hat and a veil.  In all, I don't know that I saved a lot of money... well, yea, I saved a decent amount.  Oh, I also got a hive tool or two.

With all that said, I've been doing a lot of research on Top Bar Hives.  They are not your typical commercial hives and they have some benefits and drawbacks.  I think the benefits outweigh the drawbacks and I'm now hoping to build two (Tanzian or Kenyan? - Oh the choices... most likely a Kenyan) hives in the next year... then I have to find some bee's to go in them!  First things first...

Resources for Bee's: 
https://en.wikipedia.org/wiki/Top-bar_hive - A great article honestly!
http://www.buzzaboutbees.net/
http://www.backyardhive.com/
http://biobees.com/
http://www.beginningbeekeeping.com/topbarhivebeekeeping.html
http://www.bushfarms.com/beestopbarhives.htm


Garden / Vineyard / Orchard


Things seem to be in full swing here, although the peppers are off to a slow start.  I got all my rhubarb planted and it's all up and growing!  (That's pretty good as the first year I got 1 or 2 of 10 plants to grow).  Stark Bro's even sent me two extra plants, so thank you for that!  Oh, I also have three wild asparagus plants growing around my yard... that's kinda cool!

I also planted my rhubarb - this deserves a quick review...  When I planted some at my parents house a few years back, it came as three spindly little roots about an inch around and 3 inches long... one was rotten already and the other two looked pretty lame.  My rhubarb from Stark Bro's came in about 4 inches diameter and 6 inches long.  I even took a shovel to one and split it to make three plants and they are all growing!

A few weeks back I planted the following:
2 Peach Trees, 2 Pear Trees, 2 more Apple Trees and 1 Sweet Cherry Tree (the other is coming in the fall - they had sold out before I made my order and didn't update the web page).  The good news - they are all budding out and growing!  In comparison to the trees I bought from gurneys, these things are doing great!  (Gurneys did give me a substantial refund by the way - I think it's noteworthy, although I'm a huge Stark Bro's fan now)

This pas weekend I put the FOUR grape vines in the ground that I got for free from Tractor Supply... I know, it's kinda strange... but I'm excited about growing my own grapes now too!  I have all sorts of plans in my head for what I can do with them.  I have two Concord Grape vines to make juice and jelly, a Niagra for eating and I can't remember the other.  I am a little worried about the Reliance grape vine I got from Stark Bro's however, as it's not yet budding out.

I'm also getting ready to build... drum roll...

The Planet WhizbangT-post Grape Trellis

Hopefully I'll have pics of that soon! The only difference for me is that the 1" Conduit comes in 10' lengths, so I'll have 10' spans between posts, unlike Herrick Kimball's 8' recommended length.

I also planted 3 Primocane Red Raspberries a few weeks back that have yet to show any life sign... so I may have to make do on Stark Bro's 1 Year Satisfaction policy.

Chickens

Good news - I haven't killed any more of them!  I also, through some roundabout ways, determined that the first chicken had "Water Belly".  This is apparently a relatively common event with chickens, especially fast growing meat chickens.

Here is a quote from a great site to learn more about it:

-----------------------------------------------------------------------------------------------------
"Water Belly refers to the fluid accumulated in the abdominal cavity as a consequence of heart failure. The disease is more scientifically known as pulmonary hypertension syndrome and this disease may or may not actually end up as what is known as ascites."
-----------------------------------------------------------------------------------------------------

Hopefully it isn't a problem in a large number of birds... I'm butchering in less than two weeks!  Speaking of which, those guys are getting a little bit more cantankerous to those ladies in there... not to mention working on crowing every morning... I'm sure the neighbors love it! 

Monday, July 21, 2014

Butchering 59 Chickens in One Day...

WELL THAT WAS A MISTAKE!


I don't know how many of you have ever butchered a chicken, considered raising them or even eaten one...but let me tell you that it is not a fun process to butcher them.  Now Herrick Kimball makes a good tutorial and equipment plans for butchering them, and I am incredibly grateful for his work... but next year, we'll be paying somebody to do that work.

The process:

Killing a chicken... I turned it upside down in a killing cone and slit both sides of the neck.  Pretty easy.

Scald the chicken... keep the water between 145 and 150!  When the wing feathers come out easily, time to pluck.

Pluck... check out the Whizbang Chicken plucker.  I borrowed one from a guy at work... Thank God!

Butcher... http://www.butcherachicken.blogspot.com/   - Nuff said, good job Herrick!

Freeze the bird...

Be exhausted and have to clean up...

I need to get better at bringing in pictures to post!

Wednesday, June 25, 2014

A Steal of a Deal & Standing Water

Yesterday was an interesting day... but maybe I should back up a few first.  This past weekend I was up north for a wedding and thankfully our neighbor took care of the chickens.  Last week it started raining, twice real hard to the point that my swale filled up to the top.  When I got back from the wedding, the ground was wet and the swale was once again filled up... my response: "Cool, it's working!"

Monday, it rained again.  I went out and put down straw in the chicken tractor to help them stay dry.  Yesterday, it rained again... at this point, there was hardly a spot in the yard I could do without stepping in an inch or two of standing water = PROBLEM!  (We have gotten over 2.6inches of rain in the past week! - according to the weather underground)

Chickens internal body temperature is higher than humans... somewhere in the 107-8°F range.  Therefore, getting wet can get them sick!  Last night Amanda helped me move the chicken tractor to a dry spot... involving her in the tractor motivating the chickens to move, so I don't run them over, will they got to the dry spot.  We then added a tarp over the entire tractor and put down more straw.  All of which was done in the pouring rain...

Thanks babe, we both know I couldn't have done it without you!

Before all of the chicken drama took place, however, I had to run to Tractor Supply to pick up another bag of chicken feed...

As an aside, the 700lbs I first purchased is gone and my spare 50lb of Purina is also gone, as of this morning.  Friday I have a neighbor taking me out to get feed from a local Amish guy, so hopefully my bag from yesterday will hold me over till then!

So I bought my bag of feed and some oyster shells (those chickens go crazy when I throw egg shells in the tractor, so I figure some extra calcium might do them good) and then checked their price on T-posts to steak up the fruit tree's I just ordered... but none were out where they normally were... so I paid for the feed and shells and took them out to my truck.  Out in the parking lot I noticed bundles of T-posts!  I checked the price and headed back in to pay for ten of them... these things have thousands of uses... it's hard to imagine having too many!

As I paid for them, the cashier asked the manager to help me load them... "That's weird, I can do it myself just fine" I thought to myself... "Hmm, maybe they don't trust me?"

So I picked up the two bundles and tossed them effortlessly into the truck (sarcasm?) while the manager watched.  He then asked if I wanted clips, which I graciously accepted.  So off he went to get them, giving me time to think... that's dangerous!

After he brought them back I asked him about all the plants that disappeared, as I was hoping to buy another blueberry bush from him.  He had a phone call coming in so he quickly told me that anything on the pallets on the side were going to be thrown out and I could take whatever I wanted...  SCORE!

I came home with 1 very alive blueberry (and 3 pretty sure they are dead ones), 3-4 different grape vines, a Magnolia bush for my babe, and at least four fruit tree's including a quite alive plum, a torn up apple tree and two trees that probably won't make it, but I grabbed them as it was worth a shot to save them!

Needless to say, I've got a lot of plants to plant... what a terrible problem!

Once again, thank you babe for your help... I love you :-)

Wednesday, June 11, 2014

An update... Wow, it's been a while!


At this point is really hard to tell where I left off.  So I guess I'll start with the most recent activities an work my way backwards.

  
Any guess what I've been up to?
 ...Or maybe I'll jump around a little bit.

Dehydrator Blues

What you see above is the back panel to my Excalibur 9-tray dehydrator.  This thing has been a champ and I'm still quite pleased with it... but like all things electrical, sometimes they don't work right.

My wife and I had gone to the grocery store recently.  Being the type of person I am, we both always make a point to swing by the discount shelf to see if there is anything we like to eat on sale.  Well this time there were banana's on sale.  I bought a bunch!  When we got home and the kids were napping, I sat down and started slicing.  Before loading them into the dehydrator, I spray both sides with lemon juice to keep them from turning brown... they also dry better if I do.  I loaded them up, turned on the dehydrator and went about my life as normal.  The next day I came home and guess what... no heat (that means no dehydrating)!

So what you see above is the guts with the thermostat removed.  I contacted Excalibur (www.drying123.com) and they promptly (sort of) sent me a new thermostat and a new diode after I paid for shipping.   Then I put the banana's in the freezer and waited for the parts to come in.  I didn't do anything with the diode, so now it's sitting on a shelf by the old thermostat... which I played with and think it might work again... maybe I have a backup now?  More testing for sure!

The thermostat - the diode bridges the gap between the two screws on the right, between the fan blades.
Well I replaced the thermostat and now it works... and the banana's are still in the freezer.  I'll have to get to that soon!

SWALES


What a rototiller can do to a backyard...
 
So a bunch of weeks back my neighbor graciously accepted payment to help me roto-till my garden and also helped me by tilling up some contour lines in my backyard.   Then it became my job to turn those paths into swales.  The idea is that it is perfectly level and catches all the water run-off, holding it until it evaporates or soaks into the soil.  This helps reduce the need for watering things on the downhill side... which in my case means fruit trees and other food producers... like green beans :)  (We ran out of space in our garden this year.)

But anyway, this weekend my parents came up to help me celebrate my birthday and we, in general, had a great time.  One thing that I particularly enjoyed was my father's help digging the top swale.  Not only did we get it all dug and built, but I have found over the years that the best way to have a conversation with my dad is to take away the distractions, provide work (that doesn't require a lot of thought) to occupy one side of the brain and let the conversation occupy the other side of the brain.  This was one of those times when we were able to have a good conversation... the topic wasn't
too meaningful, but I still enjoyed working with my dad.

A swale
I don't know if you can see it, but basically I made a level ditch in my backyard... a fairly big one too!  This has taken a lot of work with a rake, pulling the dirt from the roto-tilled section towards the downhill side to create a berm of dirt... shallow enough that I can drive the mower over it without scabbing the lawn and ruining the blades.  But dad, being the very intelligent person he is, or maybe it's because it's the tool he had on hand, picked up a shovel and started digging it out.  Needless to say, it would have taken me a long time to finish up the first one without him.

CHICKENS

Those birds are getting big!  However, they are not immune to harm.  This was evidenced on Monday night while I was moving the chicken tractor back up towards the house.  Real quick - they have learned to move to the front when I move the tractor, as that's where the fresh grass is... but since the made it to the back of the yard, I had to reverse directions.  Well I ran over one of them while moving it and it died (I've run over a couple that made it just fine).  Well I fired up the turkey fryer, scalded it at 148°F (Thank you Herrick Kemball).  Anyway, I got to the step in Herrick's instructional where you remove the intestines where I ran into a problem.  Step 7 goes over opening up the back end and states the following:

-------------------------------------------------------------------------------------------------------------------------
"Please Note: When you cut into the bird’s body cavity, no liquid should come out. If liquid (i.e. yellow-colored water) does come pouring out of the opening, the bird is sick. Throw it away. I have had this happen on two birds in ten years."

-------------------------------------------------------------------------------------------------------------------------

Well guess what I found?

It died prematurely... and ended up in the compost... bummer!
When I cut it open, not only did the yellow liquid come out, but there were two very full sack's of it (see arrows in picture above).  I weighed it after plucking and it came out at 2-1/2 lbs... I guess it wasn't too much of a loss, but now I can't help but be afraid the rest of them are sick!  Still no word on what this sickness is, but I'm hoping I don't ever see it again!

Well here's an older picture (3 weeks ago) if anybody is curious what the inside of the chicken tractor looks like.  I'll have to get more pictures on my pen drive... blogging is hard when you are away from your home computer and camera!

Not quite old enough to use the big feeder!


UPDATE!


I got in contact with a nearby butcher who informed me this is called "Water Belly" and is quite common among fast growing meat birds.  My research says there's not way to cure it as it is a result of the cardiovascular system not being able to keep up with high blood pressure forcing liquid out into the body through the liver.  Can anybody verify this?

BIRTHDAY!

As I said, we celebrated my birthday recently.  My wonderful wife got me a new wooden handled, assembled in America (that's the best it comes these days, and she had to look hard to get even that!) digging shovel for fathers day and a 5 gallon crock for my birthday.  We can now make pickles 5 gallons at a time!  Yea... that's something I can get excited about!

Also, yesterday I went over to www.Starkbros.com and took advantage of their end of season sale.  I spent a good bit of money with the hope that I won't need to take them up on their 1 year promise of satisfaction, but feel good knowing its there if the plants die!  So yea, that was a good chunk of birthday money (thank you parents / in-laws / grandparents!)... but I got the following:

Two Peach Trees
Two Pear Trees
Two Sweet Cherry Trees
A Reliance grape vine (seedless) - great for making raisins or eating
Rhubarb
Asperagus
Red Rasberries

I highly recommend you guys get over there as they have some AWESOME prices right now!  I know a few of my buddies who are moving soon or have just moved... I can't think of a better investment than some fruit trees!

Okay, I'm late getting back to work.  Take care!

Tuesday, May 20, 2014

Taking Chicks Out To Pasture

Still waiting for those adult feathers to come in...

Going back to an awesome conference, the Midwest Sustainability Conference, I can remember listening to Darby Simpson talk about taking chicks out to pasture.  For meat birds, you want them out at 3 weeks of age, but you want to make that transition as seamless as possible.  Well come Thursday my not-so-little Red Rangers will be three weeks old and here is the weather outlook.

The ten day outlook
I'm thinking Sunday or Monday the birds will go out... and then we can all rejoice!  "Why rejoice" you might ask?  For one thing, these little buggers make a TON of DUST!  Seriously, who would have thought that chickens can create so much dust out of nowhere!  "Where does it come from?" - My wife has asked me multiple times... the answer, I DON'T KNOW!  But wherever it comes from, I'll be happy when it's no longer in my garage.  

At the point they go to pasture, they'll then have access to salad greens.  This is good for a few reasons... starting with one assumption: Salad is good for you.  

1) When chickens eat salad with their food, the chicken becomes healthier for me
2) When the chickens eat the salad, it's less lawn for me to mow.
3) When the chickens are done with the grass/feed, they poop and fertilize the lawn... now I have to mow more, but now it's also healthier soil!  
4) If the soil is healthy enough, I can get some four legged lawn mowers and support them on my small piece of property.
5) If I get four legged lawn mowers, I won't have to mow as much.
6) If I don't have to mow as much, I have more time to spend on productive things and I don't burn as many hydrocarbons, thus saving more polar bears!
7) The four legged lawn mowers can be eaten or sold (or the kids can take them to the fair... eventually)!

Okay, that was a rant... I'm sorry... kinda.  At least now you can share in my joy that my garage will once again be... well, not as dirty.

UPDATE: A few pictures from the season...
First week in the feeder...

Close to butchering weight

Tuesday, May 13, 2014

This weekend... an update from the Johnson property.

Well this weekend was quite a stir... there was a to do and not so much time to get it done... so where should I start?

The house

About 6 weeks back, or so, it seems God (or was it Satan tempting me?) didn't appreciate the siding on the south end of my house and used the wind to help me remove it.  One thing I discovered through all of this is that my house didn't have any Tyvek on the South wall (I don't believe my house got any when it was built).  Tyvek, or house wrap, is something of a Gore-tex lining that goes underneath the siding to keep the water and wind from infiltrating and rotting out the wood, and generally making your house less warm or cool, depending on the season.  As a result of the wind damage, we had insurance come out and give us an estimate... it was $1300 for a house with a $1000 deductible... grrr.  

Narrator: Mr Super Hadyman Husband enters stage left and gets quotes from contractors.  He finds the company that made the original siding and contacts them, only to find out they only sell to contractors.  Mr Super Handyman Husband discovers that one of the contractors will allow him to purchase the siding directly from the manufacturer through his company!  

So in the end, my father came up over Easter weekend to help me put up Tyvek and 1/2" extruded foam insulation board.  Then this week I got started putting up the siding.  Saturday morning I got up early to completed putting up 2 boxes (400 square ft), plus a little more, of siding only to be stopped short of the goal by some little boys who needed to be taken care of while mom was out shopping.  
After fixing them lunch, General mom returned to the home base and I was once again set free to attach the ever growing list of things that need to be taken care of. 

Planting the garden!


I planted two rows of green beans, only to discover I severely didn't order enough bean seeds.  I also planted some squash, cucumbers, tomatoes and peppers.

Then on Sunday I went to Lowes for reinforcements... I purchased some T-posts, electrical conduit, and a flower for General Mom for Mothers day, although Alpha (my first son) determined that he should get all the credit for that one!  All that said and done, my next plan is to build some Tomato Grow-Up Trellis's.

Courtesy Herrick Kimball


I'm sure I'll make some changes to it... in fact, I know I will.  I went to Lowes to look for the concrete re-mesh.  In Herrick's blog, he said that it comes in 5'x10' sections... well not at the Lowes I visited!  It came as an $8, 3-1/2' tall by 8' wide panel... not optimal for growing tomato's!  So my plan is to cut up a 16'x5' cattle panel to make three of these things... I'll let you know how that works out!


Chickens

Well this week we lost a chicken... so now we are down to 60 total.  They were pecking at each other and doing all sorts of mischief.  We did some research, spoke with some people and came to a few conclusions...  1) It was too hot.  This causes stress and often times leads to cannibalism.  2) I tried to quarantine some of the birds getting pecked on... it didn't work too well, but served its purpose enough.  3) We got some anti-pecking soln. from TSC (tractor supply).  It's a purple goo that comes in a glue bottle like container that smells like grape flavor, in my opinion.  I caught each of the wounded chicks and smeared this stuff on their wounds... it's supposed to help them heal and keep the others from pecking on them.  4) I reduced the heat lams from two down to one... they seem to be happier this way. 

Fruit Trees

I had ordered fruit tree's from Gurneys, but they screwed up.  I ordered them back in February, and two or three weeks back I called to ask them when they would get here.  They cancelled my order because my credit card didn't go through... and never told me!    Angry is one way to describe how I felt when they told me that... but now it gets worse.  I planted all the trees in a mixture of peat moss and horse manure, aged and mixed in well, and my two peach tree's are dead.  Why?  Well they are supposed to be in the ground by a certain time... about a month before I found out they cancelled my order.  I didn't want to do any more business with them, but now I have to... I can get store credit for the dead tree's, but have to pay shipping.... next spring.  So I basically won't have peach tree's for at least another year if I depend on them... yeap, I'm frustrated!

Neighbors

 I recently met one of my neighbors, a good ways down the road, who happened to be pruning his apple tree's.  I stopped in and simply asked if I could have some branches to try to start new tree's from cuttings.  I came home with over 40 cuttings and shortly put them in rooting compound and then in the ground... the longer branches I put into the ground in a low spot in the back yard while the shorter ones are in pots.  Weirdly enough, the longer branches seem to be doing better... but we'll see with time.  As a side note, I'm going to go back and try some air-layering to see if that works better.  Oh yea, this guy also makes wine and sent me home with two bottles... wow, thanks! 

It seems God got him ready for me moving in too, as he recently stuck grape vine cuttings in the ground in case anybody wanted some grape vines!  He said I can take all I want...  too cool!


Friday, May 2, 2014

A CJ Style Chicken Brooder and... My Chicks Arrived!


One day old.
For anybody getting into having chickens, you're most likely to get them as chicks.  If this is the case, you'll need to keep them warm, dry and fed... especially for the first few weeks.  The place you do this depends on your environment.  But here in NW Ohio, it's too cold to go outside right now, so I built a brooder in my garage.

Size and Density


There are a lot of different opinions out there about how much space a bird needs.  In my case, I purchased 60 birds and put them into a 4'x8' area, providing 0.5333 square feet per bird (minus feeders and waterer).  So while this may be a little small after 6 weeks, my plan is to get them out into the read world as soon as possible after the 3 wk mark.

The Build

As I said, I built my brooder to 4'x8', a very convenient size.  I started out with a sheet of 3/4" extruded insulation board from the hardware store sitting on top of two pallets.  Why on top of pallets?  Well, I don't know... it seemed like a good idea to keep them up off the cold cement and now I don't have to bend over so far to change out the feeders!  Along the sides I took another sheet of the 3/4" material and cut it in half down the middle, giving me 2' walls.  A third panel is needed if you are making this new, but I happened to have some scraps left over after putting it up when the wind blew the siding off the end of my house.

 
The basic design
You might have noticed some duct tape on the bottom piece... well the wind got hold of it when I was loading it and snapped it in half, right in the hardware store parking lot... BE CAREFUL if you plan on using this stuff!  It's not the strongest in the world.

Moving along... I attached the walls of the brooder to the bottom piece with nails.  This may seem like over-kill, but I couldn't think of an easier way to do it!  One thing you'll want to before you drive those nails through, however, is drill a tiny hole through the foam board.  There is a plastic coating on both sides that is difficult to puncture and the holes make it much easier to put this together.  Alternatively, you could get an ice pick and try that.  One note, you probably don't need a hammer for this, but it might be nice for the last 1/4".

Drilling the pilot holes for the nails

Driving the nails.

UPDATE: If you are going to do this, use deck screws!  The birds will push against it, the $#!* will pile up and the walls will be pushed out... left long enough, the walls can fall down... and that would be bad.

One all four sides were up, I put a plastic liner inside.  I figure this will make cleanup much easier!  I held it in place at first with duct tape till I got it where I wanted it and then stapled it into place.

Installing the plastic liner.

With the plastic liner in place, I added a bale (?) of pine shavings, some insulation to go over one end and two heat lamps in the middle.  This should provide lots of warmth in the middle if they are cold, plenty of areas that are not so warm, and lots of space in between.  This provides the chick's lots of room to find that just right spot for the amount of warmth they need.

Heat lamps, feeders and shavings... almost ready!

 The last thing I added in was a waterer.  You'll be able to read up more on that in my next post on Avianaquamiser Chicken Nipples. 


So how do they like it?

New arrivals

Well the chicks got here yesterday and it looked a little cold for them.  I was amazed at how active they were once they warmed up, but it took a few minutes. 

This is how my chicks arrived in the mail.

One thing that I did as I got the chicks out of the packaging was to hold their beaks up against the chicken nipples until they got some water out and drank it.  It is a common practice to dip their beaks in water so they know where it is, but I was a little worried they might not catch on with the nipples.  Well, so far they seem to have the hang of it... although there are still a few pecking at the water on the 2x6 underneath it.  (This is to absorb water, as opposed to it soaking the pine shavings.)

Chicks drinking from my chicken nipple waterer.

There was one disappointment as I un-packaged my birds... one of them didn't make it.  They had been hatched the day before at 5am and I picked them up the next day from the post office... I've been told it happens, but it's kinda sad.  Hopefully all of them will still be cheeping when I get home from work today!

Okay, well that's pretty much two topics in one... if you guys know of a better way, please let me know!